 This week we received great news that my favorite image editor, Snapseed, now supports RAW editing on iOS. If you have been listening to me on the show, you know that I am a huge supporter of editing on my mobile device. This breaks me loose from the bonds of the laptop computer, and gives me the freedom to edit anywhere/anytime. Having said that, this does not always happen due to the restrictions Apple has placed on their devices. Certain files or workflows are not supported on iOS, and this can drive people crazy. So, I am always looking for a workaround.
With the news of Snapseeds update, Marc Sadowski called me and we talked about the potential of editing our RAW images. The question came up in our conversation and is the genesis to this post: How do you get a RAW file onto the iPhone? I had not yet tried to get a RAW image onto the iPhone, but I had a secret weapon in my arsenal of apps: AirDisk Pro. This app, on my iPhone, has been a lifesaver for me over the years because it is my connection to the outside world. I can upload files of all sorts onto my iPhone with the simple action of “drag and drop”. I will show you how to upload a RAW file to your iPhone and open it in Snapseed.
CONNECT YOUR DEVICE TO YOUR COMPUTER
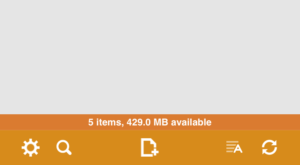 The first thing you will need to do is connect your device to your computer. This can be done using a WiFi connection. Make sure your computer can be found on the network. When you open the app on your iPhone, you will see a refresh symbol on the bottom right of the screen. This gives you different options for transferring files.
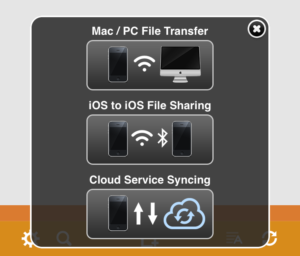 Select the first option “Man/PC File Transfer” and open your browser.
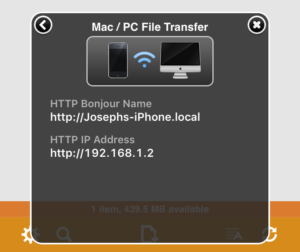 Type in the address into your browser and connect with your device. You have two options, either are suitable.
TRANSFERRING FILES
You can start transferring files once you are connected. Your browser has two options for transfer: “Drag and Drop” or “Click to Upload”.
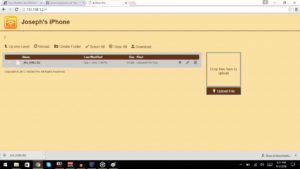 Dragging or clicking a file is easy. Don’t over do it by selecting the entire library of images or files. Do a few at a time because some files can tax the app.
You will see the file on your phone and desktop once the file has transferred.
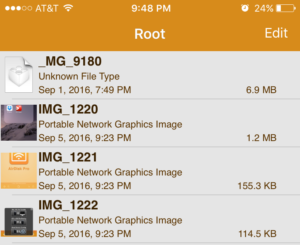 All the images and files will congregate into one area, but you can set the app up to have a file folder system. This will allow you to organize your files by project or type, and you can upload the files directly into the folder you desire.
As you can see, the RAW file shows up as an “Unknown File Type”. This is because iOS does not support RAW files. When you select the RAW file, you will see a blank screen. Do not worry. Your file is on your device.
OPEN YOUR RAW FILE IN SNAPSEED
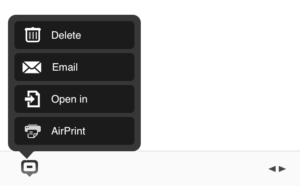 At the bottom right of your screen you will see a bubble. Tap on the bubble to reveal your options. They are: Delete, Email, Open in, and AirPrint. Select “Open in”.
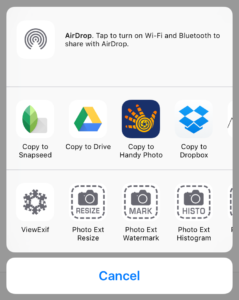 Finally you have arrived to your destination. Select the “Copy to Snapseed” and it will open up the app and prompt you to edit the RAW file.
I hope this was easy to follow. There are easier ways of transferring a RAW file to you iOS device. Matt Hoffman mentioned on the show that he used the “Lightning to SD Card” connector and had no problems, but that also means we need to carry another thing with us.
AirDisk Pro is a great option for uploading your RAW files to Snapseed. It is worth the $1.99 in the app store. You can click here to read more about the app AirDisk Pro
Also, if you want to listen to Matt and I discussing the Snapseed update, click here for Episode 175


 This week we received great news that my favorite image editor, Snapseed, now supports RAW editing on iOS. If you have been listening to me on the show, you know that I am a huge supporter of editing on my mobile device. This breaks me loose from the bonds of the laptop computer, and gives me the freedom to edit anywhere/anytime. Having said that, this does not always happen due to the restrictions Apple has placed on their devices. Certain files or workflows are not supported on iOS, and this can drive people crazy. So, I am always looking for a workaround.
 The first thing you will need to do is connect your device to your computer. This can be done using a WiFi connection. Make sure your computer can be found on the network. When you open the app on your iPhone, you will see a refresh symbol on the bottom right of the screen. This gives you different options for transferring files.
 Select the first option “Man/PC File Transfer” and open your browser.
 Type in the address into your browser and connect with your device. You have two options, either are suitable.
 Dragging or clicking a file is easy. Don’t over do it by selecting the entire library of images or files. Do a few at a time because some files can tax the app.
 All the images and files will congregate into one area, but you can set the app up to have a file folder system. This will allow you to organize your files by project or type, and you can upload the files directly into the folder you desire.
 At the bottom right of your screen you will see a bubble. Tap on the bubble to reveal your options. They are: Delete, Email, Open in, and AirPrint. Select “Open in”.
 Finally you have arrived to your destination. Select the “Copy to Snapseed” and it will open up the app and prompt you to edit the RAW file.